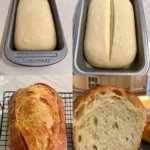
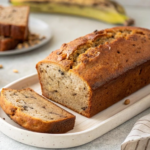
A beautifully swirled sourdough loaf with rich chocolate ribbons running through every slice. This naturally leavened bread has a soft, chewy crumb, a crisp crust, and just the right amount of sweetness—perfect for breakfast, dessert, or a special afternoon treat.
Prep Time: 40 minutes (plus fermentation)
Rise Time: 8–12 hours
Bake Time: 40–45 minutes
Total Time: About 10–14 hours
Servings: 1 large loaf
Ingredients
For the Main Dough
- 500g bread flour
- 350g lukewarm water
- 100g active sourdough starter
- 10g fine sea salt
- 20g honey or maple syrup (optional, for a touch of sweetness)
For the Chocolate Dough
- Half of the prepared dough
- 20g unsweetened cocoa powder
- 20g warm water
- 30g dark chocolate, finely grated or chopped
- 1 tablespoon sugar (optional)
Step-by-Step Instructions
Step 1: Feed Your Starter
Feed your sourdough starter 4–6 hours before mixing the dough. It should be bubbly, active, and able to pass the float test.
Step 2: Mix the Dough
In a large mixing bowl, combine the water and sourdough starter until mostly dissolved.
Add the bread flour and mix until no dry flour remains.
Cover the bowl and let it rest for 30 minutes. This rest period (autolyse) helps develop gluten naturally.
Step 3: Add Salt
Sprinkle the salt over the dough.
Add the honey if using.
Mix by pinching and folding the dough until everything is evenly incorporated.
Step 4: Divide the Dough
Divide the dough into two equal portions.
Leave one portion plain.
Place the second portion into another bowl.
Mix the cocoa powder with the warm water to create a smooth paste.
Work the cocoa paste into the second dough until evenly combined.
Finally, knead in the grated dark chocolate.
The chocolate dough will feel slightly softer, which is perfectly normal.
Step 5: Bulk Fermentation
Cover both bowls.
Let the dough rise at room temperature for about 4–5 hours.
During the first 2 hours, perform a set of stretch and folds every 30 minutes (about 4 sets total).
The dough should become smoother, stronger, and puffier.
Step 6: Create the Marble Effect
Lightly flour your work surface.
Flatten both dough portions into similar-sized rectangles.
Place the chocolate dough on top of the plain dough.
Fold the stack in half.
Gently roll it out again.
Fold once more.
Repeat this folding process 2–3 times.
Avoid overworking the dough—you want distinct chocolate swirls rather than completely mixed colors.
Step 7: Pre-Shape
Shape the marbled dough into a loose round.
Cover with a towel.
Let it rest for 20 minutes.
Step 8: Final Shape
Shape the dough into a tight round or oval.
Place it seam-side up into a floured banneton or a bowl lined with a floured kitchen towel.
Cover well.
Step 9: Cold Proof
Refrigerate the dough for 8–12 hours.
This slow fermentation develops flavor and makes scoring easier.
Step 10: Preheat the Oven
Place a Dutch oven inside your oven.
Preheat to 475°F (245°C) for at least 30 minutes.
Step 11: Score the Dough
Turn the dough onto parchment paper.
Dust away excess flour.
Use a sharp bread lame or razor blade to score one long slash or your favorite decorative pattern.
Step 12: Bake
Carefully transfer the dough into the hot Dutch oven.
Cover with the lid.
Bake for 20 minutes.
Remove the lid.
Reduce the oven temperature to 450°F (230°C).
Bake another 20–25 minutes until the crust is deep golden with rich chocolate marbling.
The loaf should sound hollow when tapped.
Step 13: Cool Completely
Transfer the bread to a wire rack.
Allow it to cool for at least 2 hours before slicing.
Cutting too soon may result in a gummy crumb.
Serving Suggestions
Enjoy this Chocolate Marbled Sourdough Bread:
- Toasted with butter
- Spread with cream cheese
- With hazelnut or almond butter
- Topped with fresh strawberries or raspberries
- Served alongside coffee or hot chocolate
- Made into a decadent French toast
Storage
- Store at room temperature in a bread bag or airtight container for up to 3 days.
- Freeze sliced bread for up to 2 months. Toast slices directly from frozen for the best texture.